T&R Seismic Calculator
Because every building is different, there is no standard seismic restraint solution to address site, location, form and function. The scope of seismic restraint and related engineering work that will be required will not be known until the ceiling design is completed. The T&R Seismic System will provide a solution for buildings with an Importance Level of 3 and below. A suitably qualified Chartered Professional Engineer will be required for Importance Levels 4 & 5. It is imperative that mechanical services, sprinkler systems, electrical and suspended ceiling design are all co-ordinated at appropriate stages.
While full compliance with seismic requirements will add cost, it will limit damage, reduce repair costs and reduce the time to re-occupy post event. Furthermore it is now a legislative requirement for Code of Compliance Certificates and Health and Safety Laws. The new laws, affect those who are upstream from the workplace (for example designers, engineers, manufacturers, suppliers or installers). Specifically they have a duty to ensure, so far as is reasonably practicable, that the work they do or the things they provide to the workplace don't create health and safety risks.
Usage Notes:
This guide allows a designer to calculate required bracing for suspended ceilings. The calculations are based on conservative assumptions. Reduced seismic bracing designs for individual sites may be possible if a suitably qualified Chartered Professional Engineer carries out a site-specific design. This guide should not be used as a calculation template for a PS-1; specific seismic design should be carried out for these cases.
This guide has been prepared by JSK Consulting Engineers for T&R Interior Systems with the usual care and thoroughness of the consulting profession. Interpretation and application of this guide is outside the control of the engineer and therefore is the users' responsibility. This guide does not constitute a producer statement or engineer's certification, and is not for use with trafficable ceilings or ceilings which support partition walls or any other service load.
Allowance for relative motion between the ceiling and structure must be provided by floating edges. If the perimeter bracing method is used then two perpendicular edges must be fixed with the remaining two floating. If back bracing to the upper structure is used, then all edges must be floating. Floating edges must also be provided around rigid or separately braced items that pass through the ceiling. The amount of clearance should be checked by an engineer on a case-by-case basis.
Consult a structural engineer for the expected earthquake deflections of the structure.
© The T&R Seismic System has been developed in conjunction with JSK Consulting Engineers, the University of Canterbury and T&R Interior Systems.
It remains the intellectual property of T&R Interior Systems and may not be used with other products.
Introduction to suspended ceiling seismic design
There are two main ways of approaching the seismic design of a suspended ceiling, each with their own benefits and drawbacks.
1. Perimeter Fixing
This approach to seismic restraint relies on connections to adjacent walls to transfer the horizontal seismic load back to the primary building structure.
The perimeter fixing approach relies on a fix-float philosophy, where the perimeter edges directly opposite a 'fixed' edge shall be 'floating'.
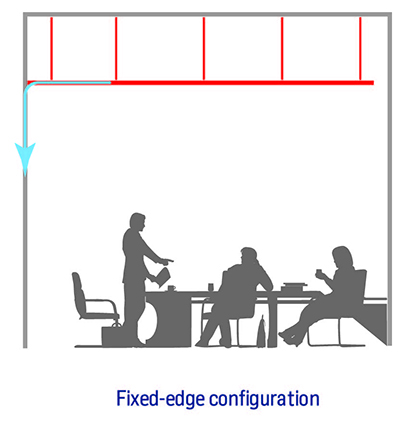
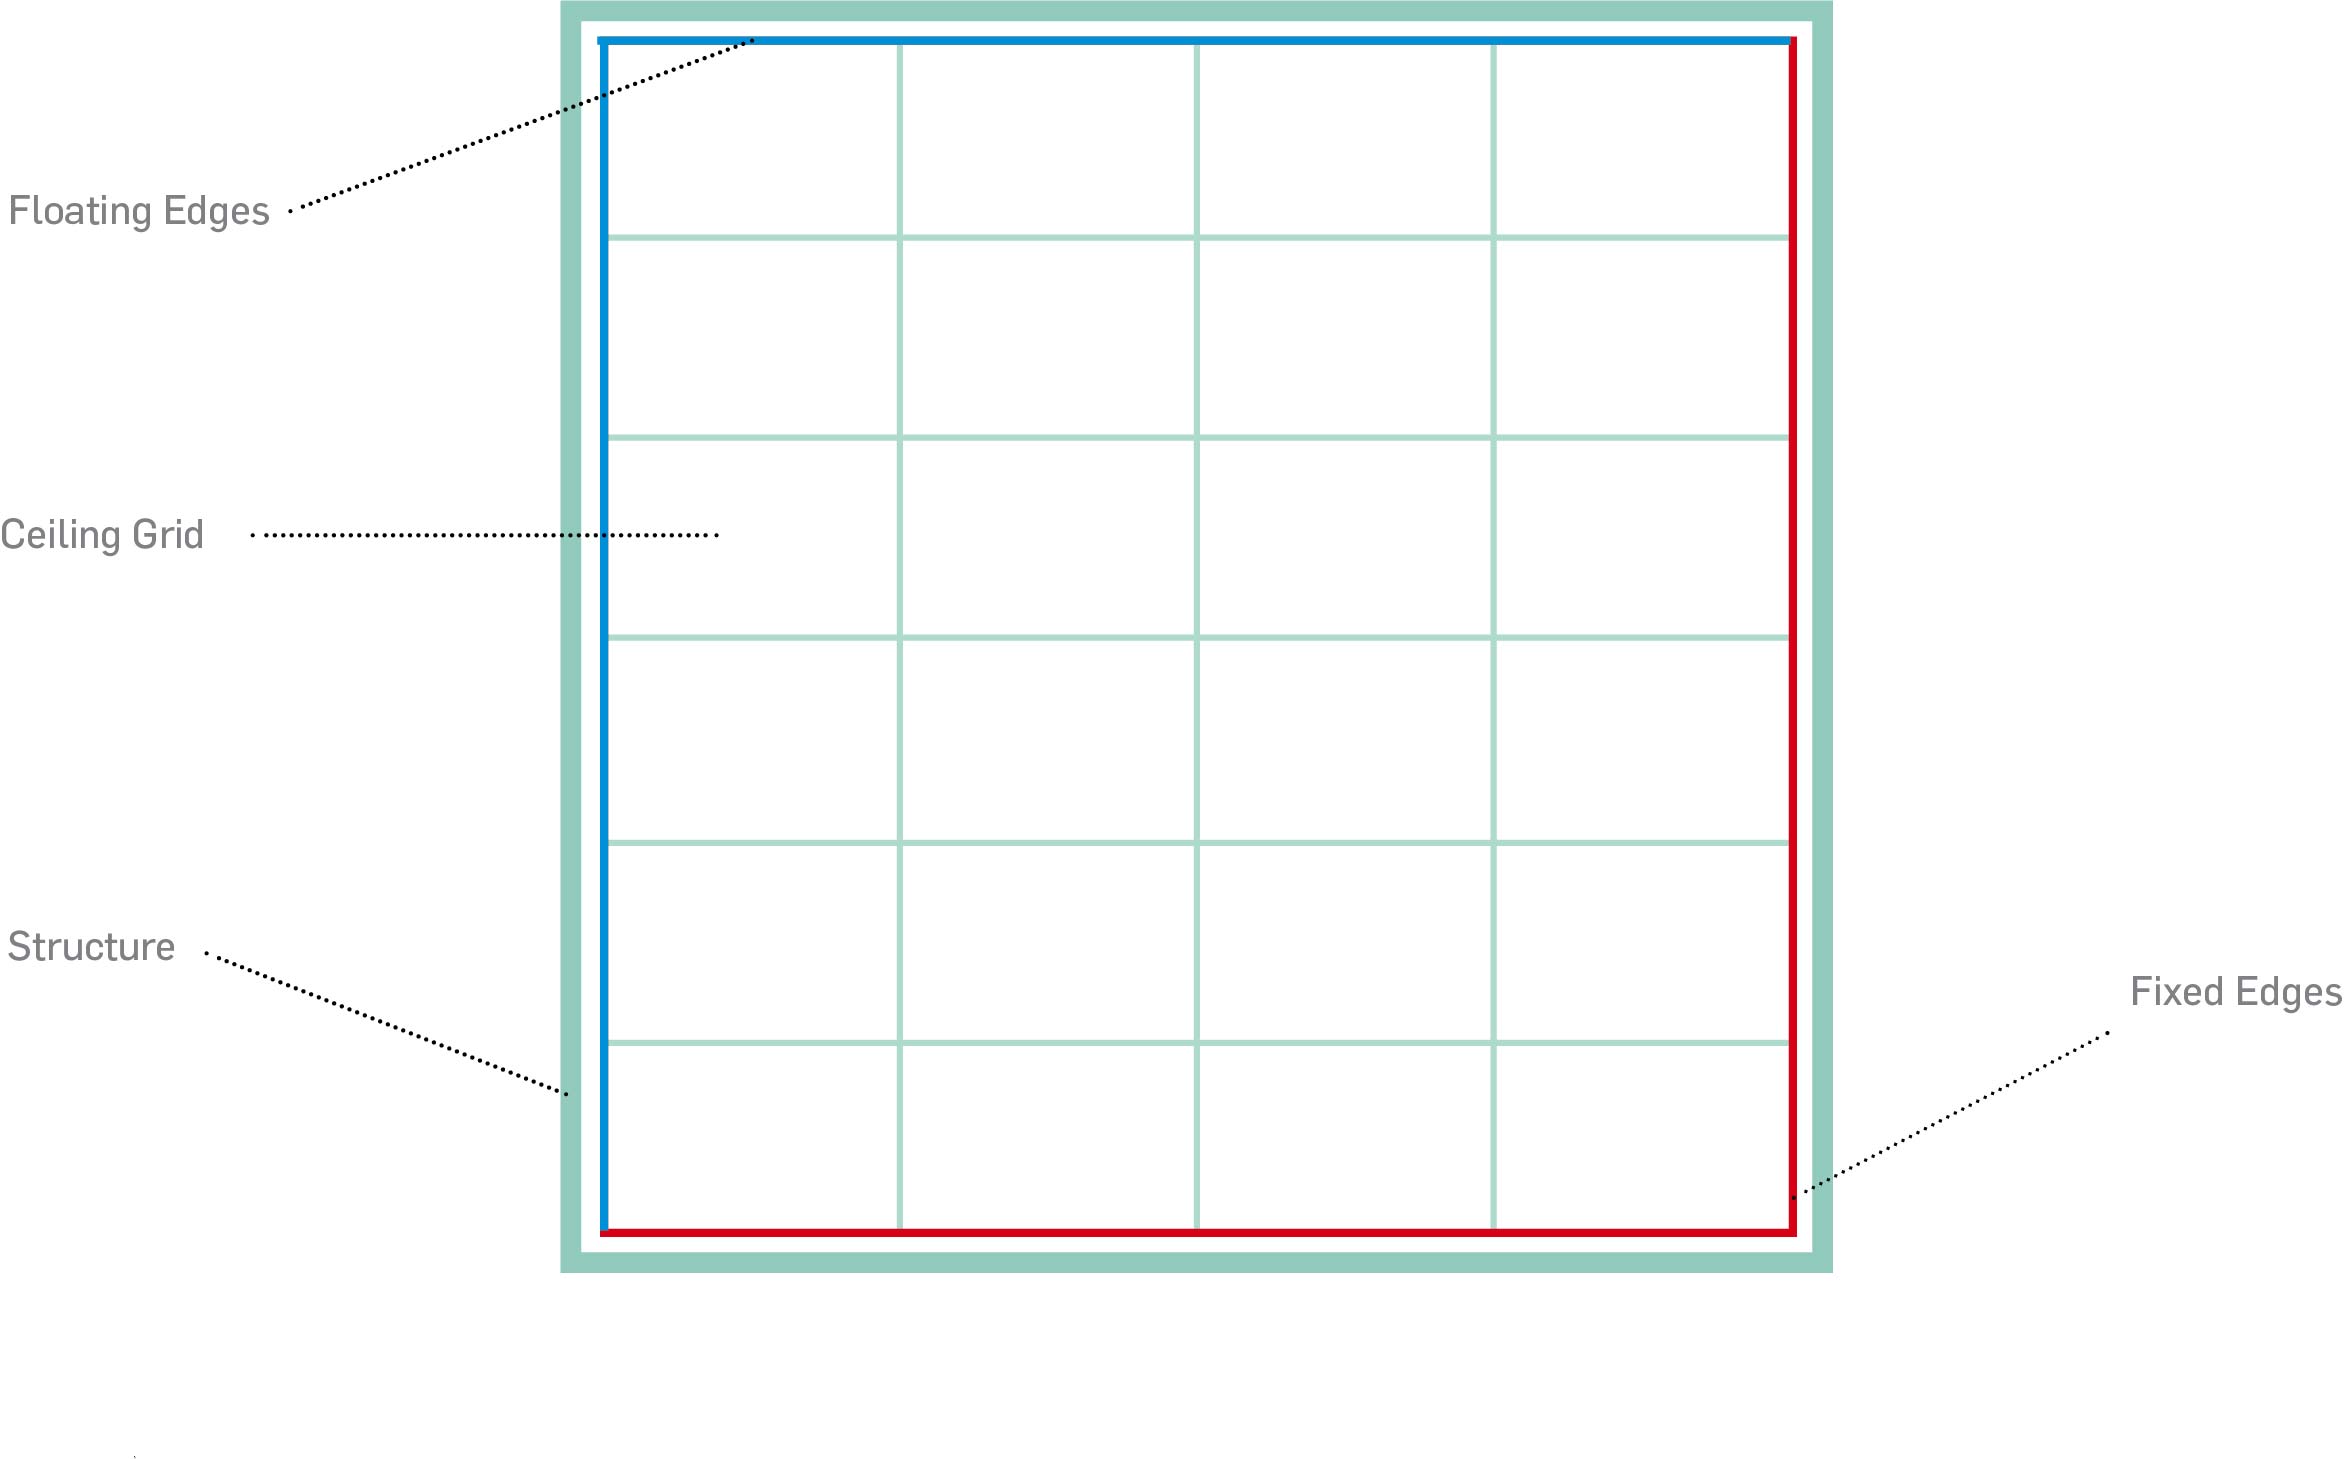
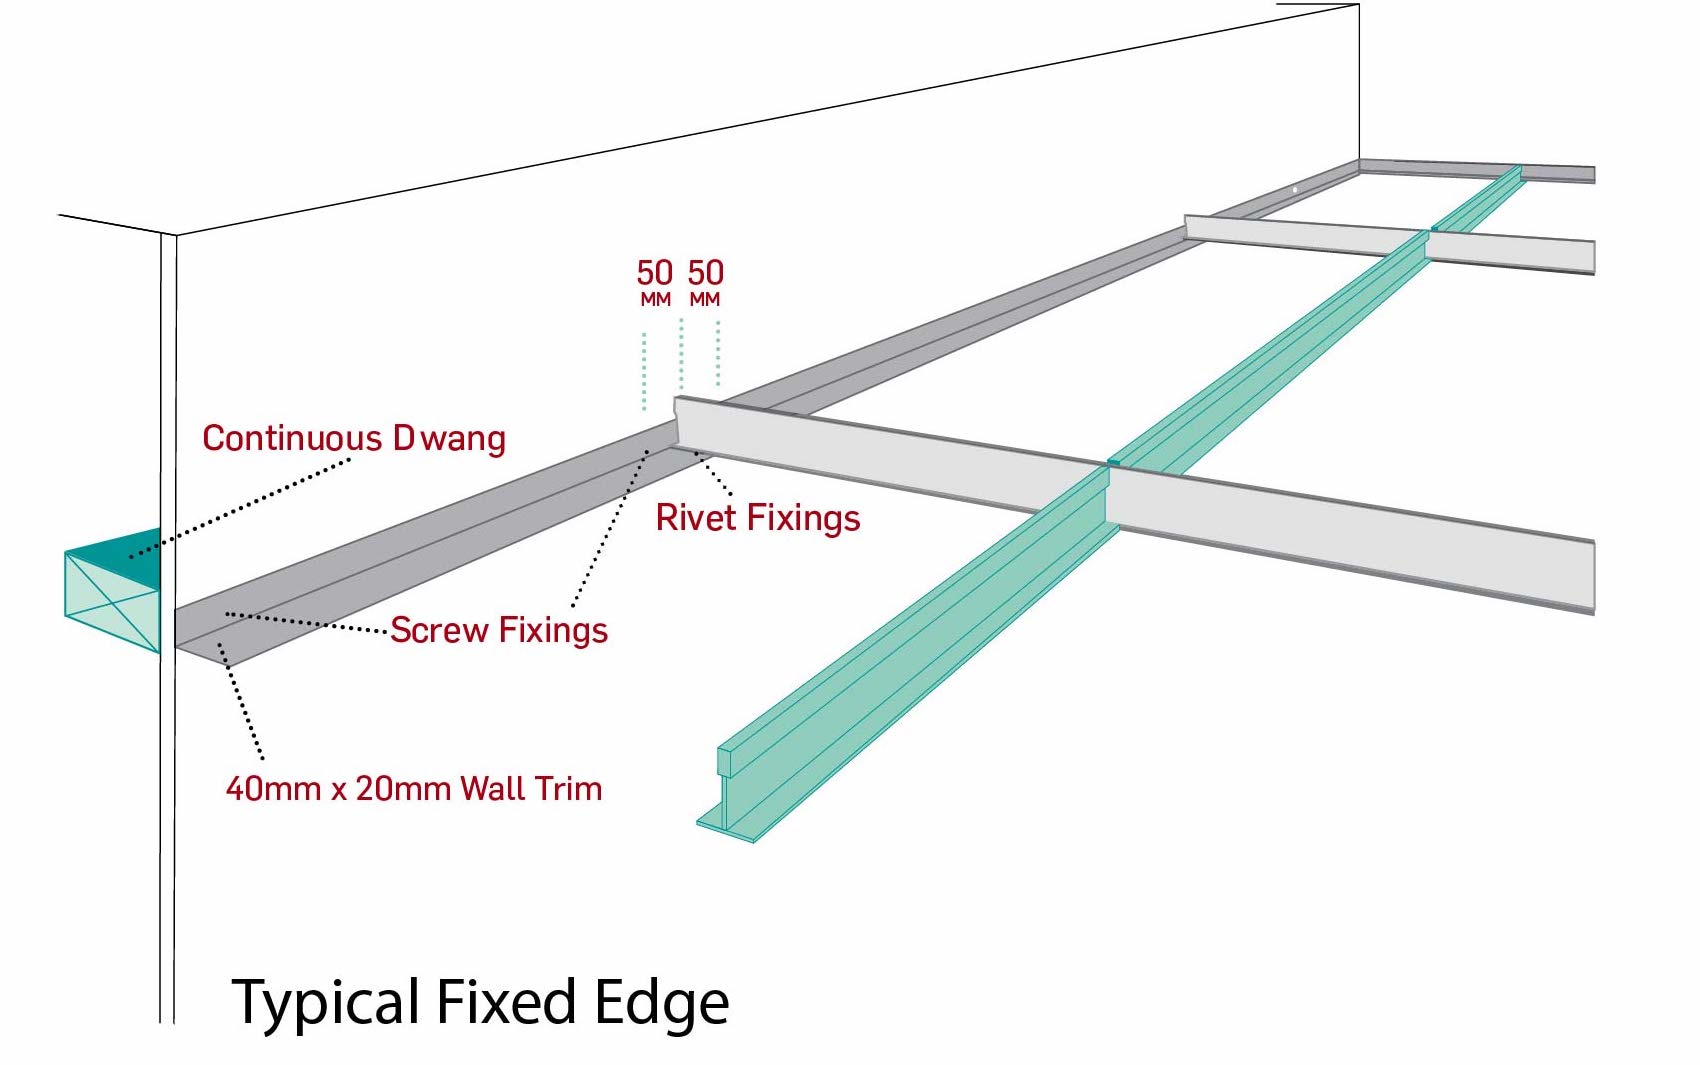
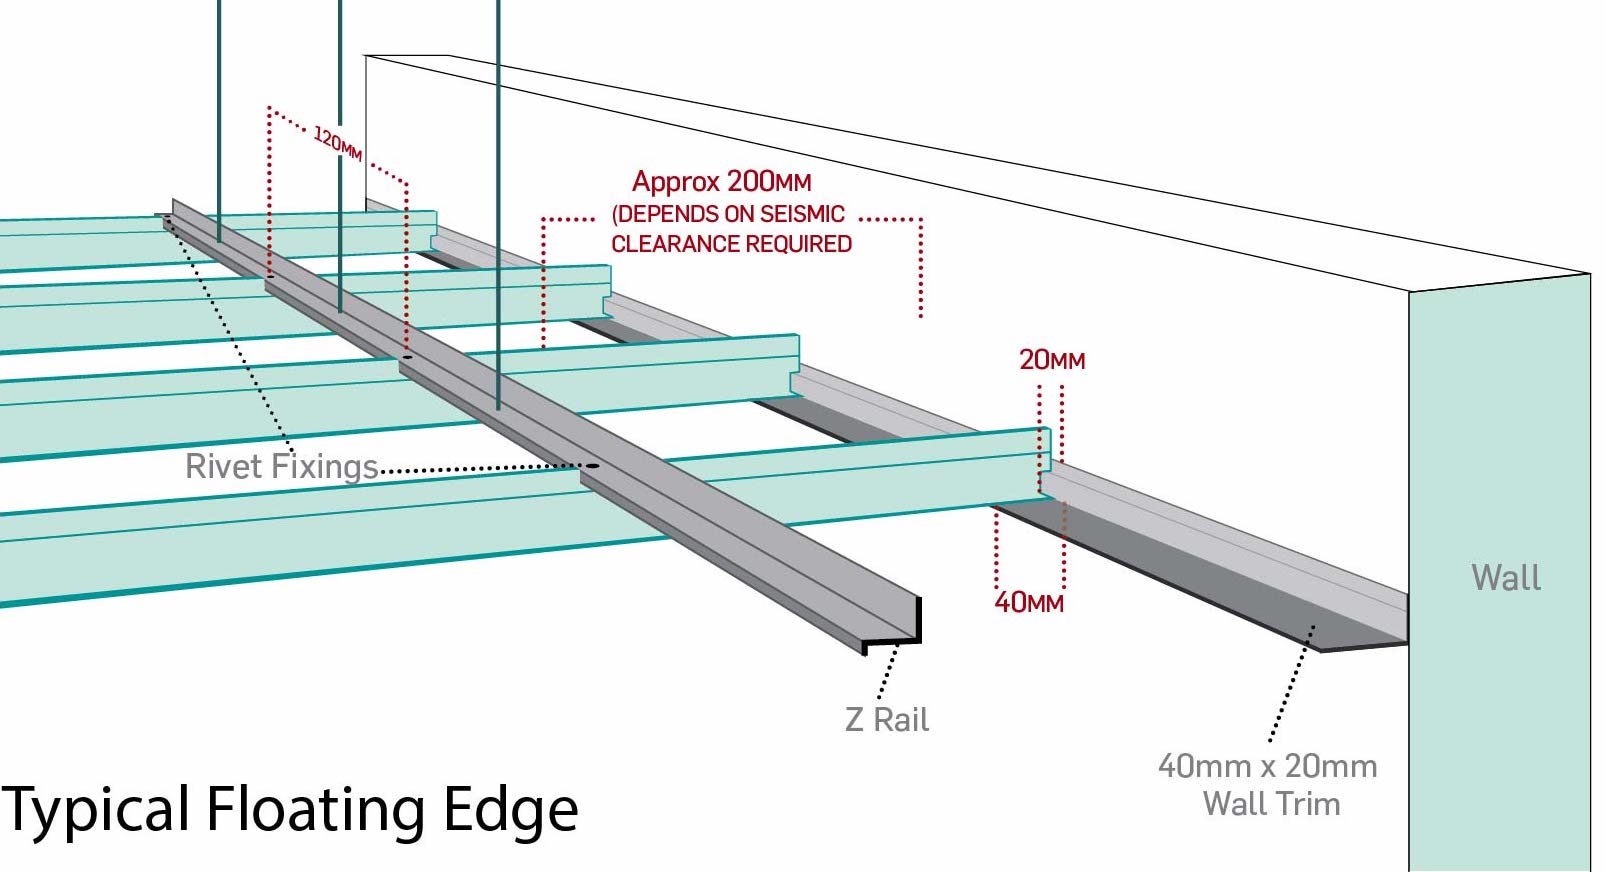
A fixed edge has the tee riveted to the wall trim and screws each side of the tee into the wall to provide a solid load path. The floating edge has seismic clearance between the ceiling and the wall to allow for movement of the building structure.
Pros:
- Cheaper and faster installation
- Less plenum congestion
Cons:
- Can only be used for small-medium ceilings, as the ceiling size is limited by the grid strength
- Walls must be capable of transferring the seismic load
Seismic joints may be used to expand the size of ceiling that may be edge restrained. A seismic joint essentially creates a 'floating' edge in the ceiling, allowing opposing ceiling edges to be fixed.

2. Back Bracing
This approach is used for larger ceilings, where the required ceiling tee lengths exceed the allowable lengths or where the walls around the ceiling cannot be relied upon to transfer the seismic load to the primary building structure.
Rigid bracing is used evenly throughout the ceiling to transfer the ceiling seismic load through to the overhead structure. This approach requires that all the perimeter edges are floating in order to prevent damage from inter-story drift.
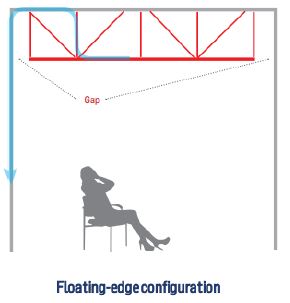
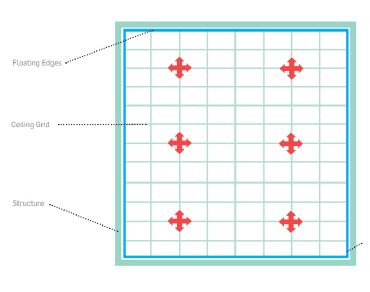
Pros
- Suitable for large ceilings
- No load from the ceiling is transferred to perimeter walls. This is important if there are part height walls or bulkheads around the ceiling that have not been designed to carry the ceiling loads.
Cons
- Larger plenum heights require large floating edge clearances
- Usually more expensive than edge-restrained designs
- Harder to keep ceiling square as there are no fixed edges
An alternative to back bracing that may be used in certain situations is rigid hangers. This approach is suitable for ceilings suspended very close (50-500mm) to purlins, rafters/trusses, or floor joists. The wire hangers are replaced with heavy gauge steel angle hangers, which are used to transfer the seismic load back to primary structure.
Step One - Limit State Type
What is limit state design?
The limit state of a ceiling determines the level of seismic activity that the ceiling must withstand. A structure shall be designed and constructed in such a way that it will, during its design working life (with appropriate degrees of reliability) sustain all seismic activity that is likely to occur.
Serviceability Limit State One (SLS1)
No damage occurs and the structure and the non-structural components do not require repair after the seismic event.
Serviceability Limit State Two (SLS2)
The system is should only suffer minor damage and should be able to be repaired within a short period of time. Ceilings designed to SLS2 may have lightweight tiles, sections of grid, and other components fall during larger earthquakes. Therefore designing a ceiling to SLS2 loads is a risk based decision and project stakeholders should be made aware.
Ultimate Limit State (ULS)
Specifically, for earthquake actions this shall mean avoidance of collapse of the structural system or parts of the structure representing a hazard to human life inside and outside the structure necessary for the building evacuation.
ULS requirements must be met for all ceilings, but there are multiple pathways to achieve this. ULS design criteria can be met by either:
- Designing the ceiling to withstand higher ULS loads. Note that damage to the ceiling is still likely to occur during a ULS event, independently tethering heavy items that could be a life safety hazard is advised.
- Design the ceiling to withstand SLS2 loads. There must be no parts in the ceiling that may be a life safety risk if the ceiling was to collapse, therefore meeting ULS requirements by ensuring there are no life safety hazards present. Designing to SLS2 only is a risk based decision that should be made by suitably competent engineer and discussed with the client and end user. It is not suitable for all projects.
Determine the type of design for the installation.
Does any part of the suspended ceiling create a life safety hazard to building occupants?
Hazards include but are not limited to:
- Heavy/hard falling objects such as heavy acoustic tiles, lighting and heaters supported by the ceiling grid.
- Ceilings above emergency egress routes or emergency exits, where ceiling collapse could obstruct evacuation of the building.
As per the suppliment to NZS 1170.5, this category can apply to ceilings which interact with fire suppression systems, emergency lighting installations and other parts.
Note that this applies for all parts and components that are essential for a building to be occupied. These would include; fire protection systems, critical plumbing systems, electrical systems and lifts. For all structures these will be elements required to be returned to an operational state within an acceptably short time frame (hours or days rather than weeks) in order for the structure to be reoccupied.
For example reinstatement of lightweight fallen tiles may be considered a viable option within the time frame indicated to allow reoccupation of a office but may be unsuitable for an operating theatre
Does any individual part of the ceiling weigh more than 7.5kg?
For the ceiling to not be considered ULS design it must weigh less than 7.5kg
Is the suspended ceiling installation at a height of 3m or greater?
For the ceiling to not be considered ULS design, it must be installed at a height less than 3m
Would collapse of the suspended ceiling block emergency egress routes?
Could fallen ceiling tiles block emergency egress routes?
Does the ceiling comply with all of the assumptions and limitations?
Assumptions and Limitations
- The design guide is only intended for use within NZ
- The building height must not exceed 40m
- The design working life of the ceiling is 50 years
- This guide only cover buildings of importance level 2 and 3
- For other importance level structures, specific seismic design is required
- Part Category 6 is not included in this generic design guide.
- Only horizontal forces have been considered in this guide. Vertical forces may need to be considered on a site-specific basis
- The period of the part is less than 0.75s
- Part ductility is dependant on whether the design is SLS or ULS
- Class C soils have been assumed
- For perimeter fixed ceilings, a continuous ceiling dwang or cross nog is assumed for suitable attachment to the perimeter trim
- The maximum tee spacing is 1200mm in any direction
- The ceiling is non-trafficable
- The seismic loads transferred by the suspended ceiling should be confirmed by a qualified structural engineer
- Any additional body weighing more than 10kg is to be separately suspended and braced
- Tiles exceeding 3kg/m2 to be clipped into the grid at all egress routes and corridors.
Obtain site specific design advice from an appropriately qualified engineer
Your Limit State Type is
SLS2 loads may be able to be used for design, consult an engineer.
As there are two limit states which apply to the suspended ceiling in this instance, the most stringent state which results in the shortest allowable tee length will apply.
Step Two - Seismic Weight
Calculate the total seismic weight based on the ceiling and service weights.
Enter or select the corresponding values in the column on the right and sum all the component weights to get a total seismic weight. This value will be used in the following steps this worksheet.
| Grid Mass |
This 600 x 600 grid is selected for use when a 600 x 600 grid is required but when the main tee spacing remains at 1200mm and an additional cross tee is used for creating the 600 x 600 grid.
This 600 x 600 grid is used when the Main Tee is at 600 mm spacing. This is not to be selected when 600 x 600 grid is required but with the Main Tees at 1200.
|
1.1 |
||||||||||||||||||||||||||||||
| Tile Mass kg/m2 |
Show Common Tiles
|
|||||||||||||||||||||||||||||||
| Services kg/m2 |
Luminaires | |||||||||||||||||||||||||||||||
| Insulation | ||||||||||||||||||||||||||||||||
| Other | ||||||||||||||||||||||||||||||||
| Design Distributed Load (min 3 kg/m2) | ||||||||||||||||||||||||||||||||
| Total Seismic Weight Sw | kg/m2 |
|||||||||||||||||||||||||||||||
Step Three - Seismic Actions
Calculate seismic force based on seismic zone, height above ground level, and building importance level.
Locate the area for which the suspended ceiling will be installed. Find the Site Specific Zone Factor by locating the line closest to the area of installation, or the shaded area it is within, and tapping it to show the rating.
|
Zone Factor Show Zones |
0.01 |
|
| Importance Level Anything above IL3 will require a design by an engineer more info |
2 |
|
| Ceiling Height Height of the highest point of ceiling above the floor (typically 2.4 - 3.5m) |
1 |
|
| Floor Height Height of the reference floor above ground level. (E.g. 0m for the ground floor) |
||
| Ductility more info The ductility of a ceiling relates to the capability of the ceiling and it's connections to absorb and dissipate energy during an earthquake without failure. A higher ductility allows for a greater ability to absorb earthquake energy, and therefore results in larger limiting lengths. Using a ductility of 1.0 is the more conservative approach.
Several NZ standards give guidance on what ductility to use for design: |
||
| Seismic Weight Sw | ||
| Total Seismic Force Sf kg/m2 |
SLS =
SLS2 = ULS = |
|
Step Four - Calculating the Grid Capacity
This section calculates the limiting tee length using the seismic force and the capacity of the grid tees.
Physical testing and calculations have given a capacity of the main and cross tees per metre. These limiting tee lengths will be used for both fixed two float two perimeter fixing and back bracing suspended ceiling seismic restraint.
The following steps calculate the maximum allowable tee lengths based on the capacity of the tees. Firstly, select the type of trim used, type of connection and the the corresponding capacity of the structural limit state.
Rivets are to be 3.2mm steel rivets or 3.2mm grade 5056 aluminum rivets.

| Grid Type | ||
|
Connection Type (wall angle) If limiting tee length is not satisfactory, then increase the number of rivets to increase the allowable tee length. If none of these options work then seismic breaks or back bracing will be required. For riveted fixed edges, minimum trim thickness is 0.6mm BMT. Note that trim size doesn't matter for the seismic clips. Trim must be large enough to accommodate the required floating edge clearance. |
|
kg
|
When a 600 x 600 grid is required for design, the most common method for laying out the grid is to use main tees spaced at 1200mm, cross tees spaced at 600mm and then an additional cross tee to achieve 600 x 600 layout.
It is important that if the additional cross tee is added to achieve the 600 x 600 layout that the grid weight in the previous section has been increased. Also in determining the total grid capacity, the Main Tee is selected at 1200 mm and Cross Tee at 600 mm is selected. Selecting Main Tee at 1200 and Cross Tee at 600 allows for the correct capacity calculation of a 600 x 600 grid.
The 600 x 600 grid layout when the main tee is spaced at 1200mm with addittional cross tees making up with 600 x 600, has a reduced strength compared to laying out Main Tees at 600mm spacing.
Connection Location explain
If you wish to specify the location of the first tee connections, a note is to be added to the installation information stating that full lengths of main/cross tees are to be used around the fixed edges of the ceilings. Refer to the diagram below

- When yes is selected for the main tee direction, the limiting lengths are increased by 3.0m
Specify the location of the first Main Tee connection?
Note: If the wall trim connection capacity above is less than the grid capacity, then this won't have any effect.
Limiting Main and Cross Tee Lengths with Grid Strengthening
View Grid Strengthening Example. example
The T&R 4-way clip can be installed at main or cross tee connections, this allows the limiting tee length to be increased in some cases.

4-way clip installed on cross tee connection.
Strengthen Main Tees?
Strengthen Cross Tees?
Is the ceiling raked?
| What is the rake angle? (degrees, max 20°) |
Limiting Lengths
| Limiting Tee Length | SLS | SLS2 | ULS |
| Limiting Main Tee Length (max) Lmt | m | ||
| Limiting Cross Tee Length (max) Lct | m |
Enter the Maximum measured Tee Lengths as per plans supplied
If your allowable tee length is larger than the maximum tee length which you want to install, then the perimeter fixing method is appropriate and your seismic design for the suspended ceiling is complete. Click here to learn more about perimeter fixing.
If your allowable tee length is less than the maximum tee length which you want to install then several options are available to ensure the design is satisfactory.
The first option is to try and break the ceiling up through the use of Seismic Joints to ensure that the allowable tee length is not exceeded by the installation tee length.
The second option is to try Rigid Hangers. This section calculates if rigid hangers are suitable for providing dead load, live load and seismic restraint of the ceiling.
The third option is using Back Braces to transfer the seismic load of the ceiling to the structure, with floating edges around the sides of the ceiling.
Step Five - Calculating Rigid Hanger suitability
This section calculates if rigid hangers are suitable for providing dead load, live load and seismic restraint of the ceiling.
Rigid Hangers are suitable in the following situations:
- Low plenum height (less than 600mm)
- Purlins or timber joists above
- Edge restraining the ceiling is not suitable
- The plenum height is larger than 600mm)
- Concrete slab is above (back bracing is more suitable in this situation)
If rigid hangers are used, the suspended ceiling should have floating edges on all edges.
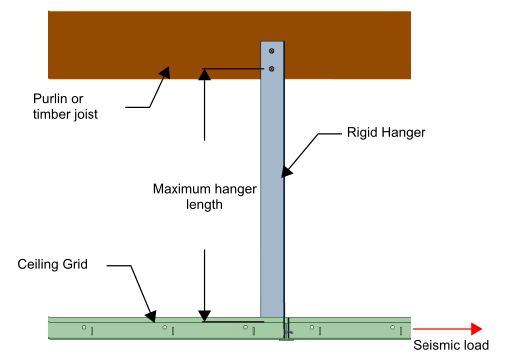
Typical Rigid Hanger installation example (pdf)
Height of connection to structure
This is the maximum height of the rigid hanger connection to structure. Measure from the connection to overhead structure to the ground level.
| Connection Height (m) |
Maximum Plenum Height
Specify the maximum plenum height so the seismic moment per hanger can be determined. This needs to be less than 600mm.
| Maximum Plenum Height (mm) |
Seismic Moment
The maximum allowable plenum height for rigid hanger ceilings is 600mmm. The seismic moment per hanger is then equal to the seismic load multiplied by the hanger spacing and the plenum height. Repeat this separately for ULS, SLS1 and SLS2 seismic forces.
Hanger Spacing
| Choose Hanger Spacing |
| Design | Hanger Span (m) | x | Hanger Spacing (m) | x | Seismic Force (kg/m2) Sf | x | Plenum Height (m) | = | Seismic Moment per Hanger (kgm) |
| ULS | 1.2 | 1.2 | = | ||||||
| SLS2 | 1.2 | 1.2 | = | ||||||
| SLS | 1.2 | 1.2 | = |
Hanger Type
As per AS/NZS 2785 3.2.2 (c), if the Dead and Live load per hanger is less than 50kg then 50kg shall be used as the design load. The allowable loads per hanger are shown in the Table below. If a hanger spacing of 2.4m is specified, hanger wires at 1200x1200mm spacing are required for static support of the ceiling.
| Hanger Type | Tensile Capacity | Bending Capacity |
| 40 x 40 x 1.15 BMT Equal Angle | 412kg | 4.5kgm |
Hanger suitability check
The suitability check is then carried out as follows.
| Dead and Live load per hanger | / | Tensile Capacity | + | Largest Seismic moment per hanger (kgm) | / | Bending Capacity | < | Design Criteria |
| 412 | 4.5 | < 1 |
If the design criteria is met, then rigid hangers may be used to adequately restrain the ceiling under dead, live and seismic loads.
Step Six - Selecting Back Bracing
Determine the maximum area of ceiling that each brace can support based on seismic force, brace type and the plenum height.

StratoBrace back brace
Installation arrangement of StratoBrace back brace. The brace is constructed of various steel stud compression posts with 2x steel studs at 45 degrees in each direction, depending on the plenum height.. Instead of using the steel studs fastened directly onto the grid, a StratoBrace bracket is used.
Height of connection to structure
This is the maximum height of the back brace connection to overhead structure. Measure from the connection to overhead structure to the ground level.
| Connection Height (m) |
| Brace Type Show brace detail | |
|
Plenum Height (mm)
Select the figure that corresponds to your actual measurement rounded up |
Choose a Brace type first
|
| Brace Capacity (kg) | |
| Area per Brace (brace per m2) Ab |
Step Seven - Back Bracing Layout
The back bracing should be arranged as per AS/NZS 2785:2020. A summary of requirements is below:
- All ceiling edges should be floated (unless single direction back bracing is used)
- Braces should be set out in a "grid" pattern, the area supported by each brace must not exceed the area per brace calculated below.
- The distance between the first line of bracing and the perimeter walls should not exceed half the brace spacing.
- Position braces at grid connections between main and cross tees.
- Typically, there should be at least 4 braces per ceiling, however 2 braces can be used if the ceiling is very small.
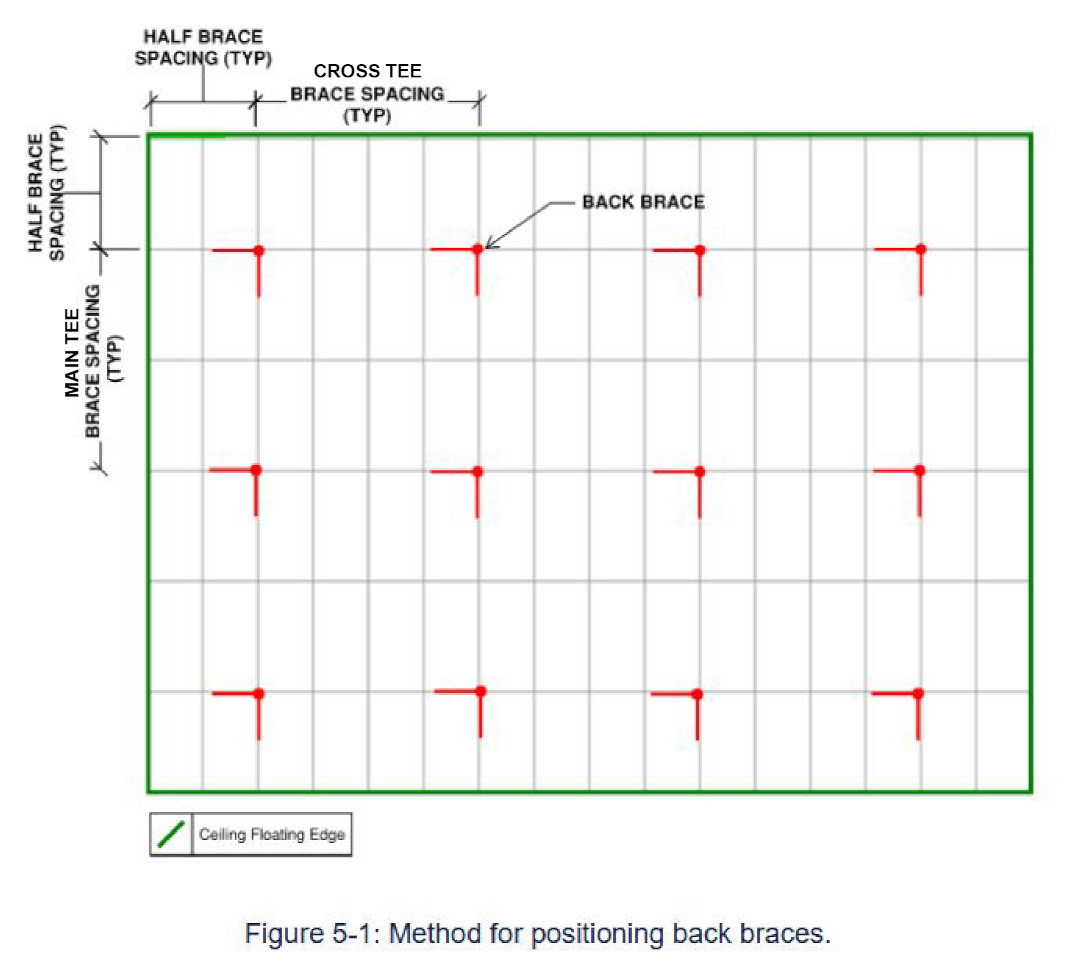
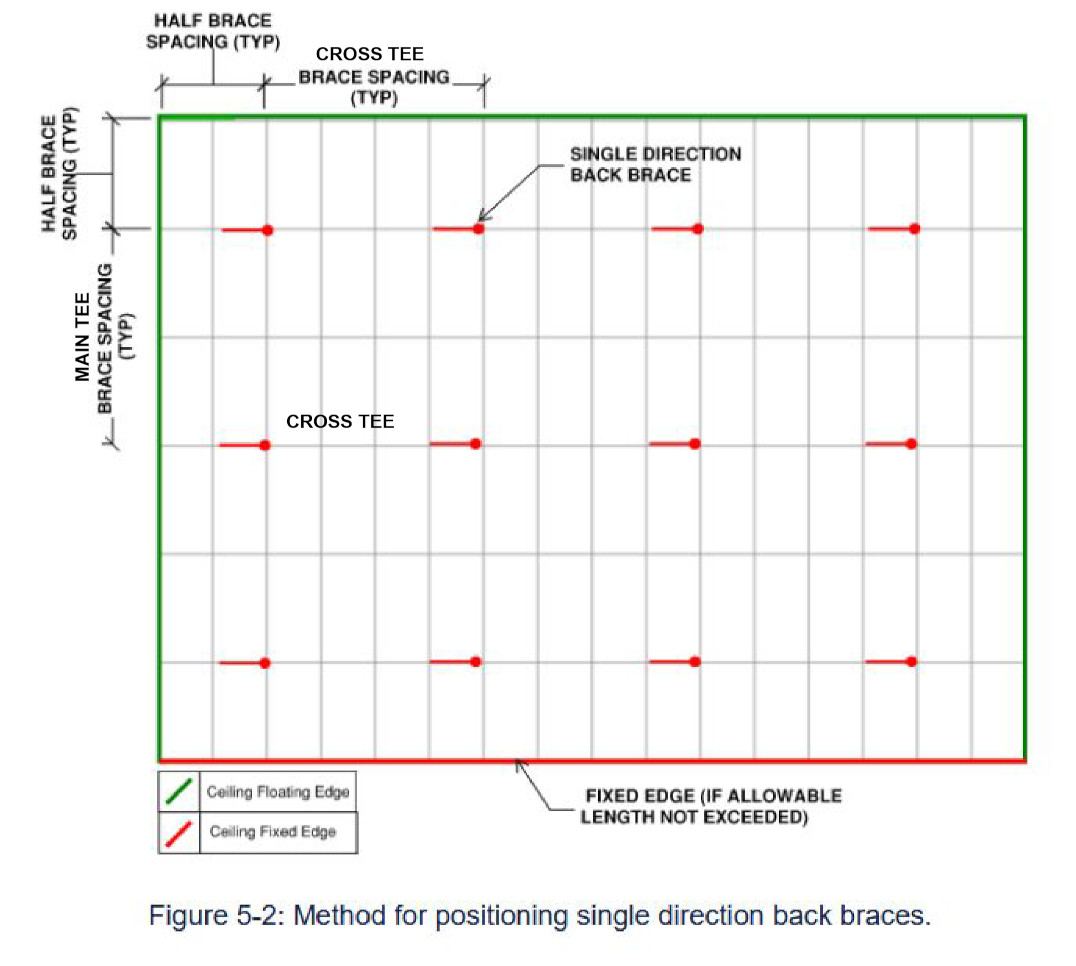
Back Brace Layout Spacing MT
| Area per brace | |
| Maximum Spacing for Main Tees | |
| Maximum Spacing for Cross Tees |
Step Eight - Back Bracing Seismic Clearance
Determining a seismic clearance is to ensure there is sufficient clearance to allow parts to move relative to each other during a seismic event.
| Type of Design | Plenum height (mm) | Interstory Drift Factor | Required Seismic Clearance (mm) | ||
|---|---|---|---|---|---|
| SLS | X | 0.0075 | = | ||
| ULS | X | 0.025 | = |
Round the required seismic clearance up to the nearest 5mm and ensure that this clearance is used on the floating edges required in the back braced design.
For larger plenum heights the required seismic clearance may be impractical, for site specific installations contact a suitably qualified consulting engineer.
We're done!
You Will Need...
- Building Location
- Ceiling Height
- Tile Weight
- Reflected ceiling plans
- A section showing plenum depths
This design is for 2 way exposed 24mm CBI grid only and cannot be used with any other manufacturer's grid
Limit State Types
About Limit State Types
A limit state is a condition of a building or building component beyond which it no longer meets defined design criteria. The condition may refer to a degree of loading or other actions on the structure. The criteria refer to provisions that deal with structural integrity, fitness for use, durability, serviceability or other design requirements.
Two basic limit states are defined by AS/NZS 1170 Structural design actions - the serviceability limit state (SLS) and the ultimate limit state (ULS).
These two limit states, as well as having different Annual Probability of Exceedance requirements, have other factors that determine design. As a general rule; the Serviceability Limit relates to the deflection criteria of the structure, whereas the Ultimate Limit State is concerned with the Strength Criteria. When exposed to an ultimate limit state event, a building or component may suffer damage but may not undergo collapse. When exposed to a serviceability limit state event, a building or component is expected to have no or very minor damage.
Serviceability limit states are associated with much smaller earthquakes than ultimate limit states, but have a more stringent performance requirement. EITHER LIMIT STATE CAN GOVERN: you must select the most stringent requirement of the limit states that apply (note that a component subject to a ULS performance criteria will also be subject to a SLS performance criteria, and both of these must be satisfied.
Importance Level
Importance Level Details
| Importance Level | Comment | Examples |
|---|---|---|
| 1 | Structures presenting a low degree of hazard to life and other property | Structures with a total floor area of < 30m2 Farm buildings, isolated structures, towers in rural situations Fences, masts, walls, in-ground swimming pools |
| 2 | Normal structures and structures not in other importance levels | Buildings not included in Importance Levels 1, 3 or 4 Included in this section is buildings posing a normal risk to human life or the environment or a normal economic cost should the building fail. These are typical residential, commercial and industrial buildings. |
| 3 | Structures that as a whole may contain people in crowds or contents of high value to the community or pose risks to people in crowds | Buildings and facilities as follows:
Power-generating facilities, water treatment and waste-water treatment facilities and other public utilities not designated as post-disaster Buildings and facilities not designated as post-disaster containing hazardous materials capable of causing hazardous conditions that do not extent beyond the property boundaries |
| 4 | Structures with special post-disaster functions | Buildings and facilities designated as essential facilities Buildings and facilities with special post-disaster function Medical emergency or surgical facilites Emergency service facilities such as fire, police stations and emergency vehicle garages Utilities or emergency supplies or installations required as backup for buildings and facilities of Importance Level 4 Designated emergency shelters, designated emergency centres and ancillary facilities Buildings and facilities containing hazardous material capable of causing hazardous conditions that extend beyond the property boundaries |
| 5 | Structures that have special functions or whose failure poses catastrophic risk to a large area (eg 100km2) or a large number of people (e.g., 100 000) | Major dams Extreme hazard facilities |
Height Factor
Height Factor
The height to be used is the height where the ceiling connects to the structure from the soil level, which is generally the ground floor. For a perimeter fixed design the connection height is the level at which the ceiling connects to the perimeter wall. For a back braced design the connection height is the height at which the ceiling connects to the structure above.
Perimeter Fixing
Perimeter Fixing
The T&R seismic system advocates two methods of seismic edge restraint. The first is a fix two sides and float two sides, while the second system allows for all sides floating and the installation of back braces to absorb the seismic load.
A fixed side is a side of the grid tee which is attached, generally with a rivet, to the wall trim. A floating side is a side of grid tee which is not attached through a rivet, with the tee sitting on the trim (although still being supported through the wire gravity supports).


In this instance, a two sides fixed and two sides floating design is appropriate based on the both the site and installation information. The fix two sides and float two sides system relies on two of the sides being fastened to the wall trim and the two opposite sides being floated, not connected to the wall trim.
This system relies on two perimeter walls to add support and brace the ceiling, but allows movement on the opposite side to prevent the grid pulling apart or crushing under compression.
The T&R seismic system utilizes a Z rail on the floating side to suspend the grid perimeter and take the dead loads to the structure above. The Z rail locks over the tees and is attached to the grid by rivets at 600 centres along its length and is suspended independently. This creates a 'frame' around the ceiling and allows the ceiling to move with the structure above.
The tees stop short of the wall to provide seismic clearance. A nominal 20mm is recommended but may be increased for specific design requirements and building deflection. This should be assessed on a case by case basis.
The T&R Seismic System specifies a nominal 20mm seismic spacing between termination of the tee and wall.
The expected deflection at ceiling height = the seismic spacing required
Seismic Joints
Seismic Joints
Seismic joints are used to break up the ceiling into smaller areas when the ceiling installation tee length exceeds that of the maximum allowable length based on tee capacity, connection capacity or the wall capacity.
The seismic joint effectively creates a fixed / floating edge breaking up the tee lengths in the installation. This allows the ceiling to still use perimeter fixing with a seismic joint, rather than back bracing the ceiling - providing a cost effect solution for some installations.
The other situation in which Seismic Joints are required is where a seismic joint already exists in the structure above the suspended ceiling.

Notice
This tool is only for use with CBI/T&R Products
© The T&R Seismic System has been developed in conjunction with JSK Consulting Engineers, the University of Canterbury, EQ Struc and T&R Interior Systems. It remains the intellectual property of T&R Interior Systems and may not be used with other products
Please enter your details in the form below to signify that you understand and agree to the terms of use.


